

You might have everything you need to explore the backcountry (or maybe you plan to rent it from our Alpine Demo Centre!) but have you thought about preparing your body for those leg-burning powder days?
We may have been running, biking and hiking all summer, but the muscles you use for skiing and snowboarding have likely been neglected. Have you considered how best to fuel your body to keep energy levels high on a long day of touring? In Whistler and Squamish, we’re lucky to be surrounded by many excellent physiotherapists, personal trainers and yoga teachers, and even luckier still that they’ve shared some of their best tips!
So read on, learn something new and get the most from your season!
Backcountry Fitness and Conditioning
Meaghan Sutter
“There is no doubt that ski touring and splitboarding challenges all facets of fitness therefore, you need a training plan that challenges you accordingly. A program should be designed to focus on uphill skiing fitness, downhill skiing strength and all day stamina. Not only that, we need to include a means of avoiding acute or overuse injuries that can often develop from such long-duration, demanding sports. Often our programs only incorporate movements that are similar to our sport, which of course are necessary, however we need to balance the body’s musculature in order to enjoy our sport injury free for years to come. Consistently pounding away at the same muscles over and over will only lead to pain, increase potential for injury and eventually, cease your ability to enjoy your beloved sport.
Build your foundation – focus on well-executed strength moves 2-3 days per week
The foundation of your training should be full range, functional movements that teach your body how to move effectively and efficiently. There is not a single athlete on earth that doesn’t benefit from having a structurally sound, full range squat – so why would backcountry enthusiasts be any different? Not sure if you’re squat technique is sound? Grab your nearest certified trainer and get them to have a look. Sure, you may think “of course I can squat!” but you’d be surprised what a properly trained eye can see. Be sure to incorporate single leg strength and stability – it is crucial for powering through those long days up and down the slopes. Don’t just focus on the ‘push’ component of the movement; emphasizing the ‘negative’ or the eccentric phase is strengthening your muscles to absorb the force while you ski back down the mountain.
Example exercises:
Squat variation – back, front, goblet, or bodyweight, rear-foot elevated split squats, deadlifts, single leg hip hinges, step ups
Side note – Ensure that you focus on ‘non-skiing’ muscles such as hamstrings and glutes to balance out strong quads

Improve your conditioning – incorporate two styles of cardiovascular training 2-3 days per week
Once you know your technique is sound, it is imperative to perform different forms of cardiovascular training. We need to focus on two energy systems here – our long duration aerobic system and our short-term lactic acid system. To mimic the many hours spent touring, focus 1-2 cardio workouts on long-duration, incline challenges such as hiking, trail running, or mountain biking; If you’re in the gym, work on a treadmill with an incline or use a stairmill. To train your short-term energy systems, focus on various interval training techniques. These workouts should include body weight exercises performed in a circuit with explosive plyometrics.
Example exercises:
Jumping lunges, jump squats, box blasts, box jumps, stepback lunge and hop
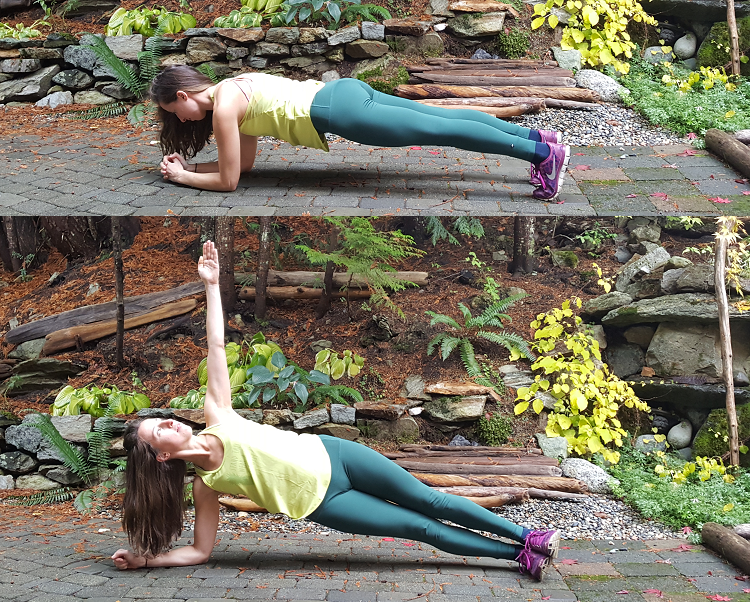
Core is king – and I’m not talking about abs!
People often group abdominal strength with core strength however these are not synonymous. Our core includes every muscle in and around the spine and pelvis – namely, the transverse abdominis (our deepest core muscle), obliques and glutes. A properly functioning core not only prevents low back pain and knee injury, it also provides a stable base for our limbs to work from. Would you shoot a canon from a canoe? Nope. So why would you work with anything other than a strong pillar for a core.
Example exercises:
Planks, deadbugs and variations of, cable rotations, farmer’s walks, glute bridges
Side note: Your major foundational movements such as squats and deadlifts are excellent core stabilization and glute exercises when executed properly.
Give your muscles some love – with a stretching and foam rolling routine
Your muscles work hard to keep you going day in and day out – the more you take care of them, the better they can perform for you. After putting in the hours on the mountain, our muscles can become tight, knotted and restricted which can limit us during our next adventure. Applying a targeted stretching and rolling routine can increase blood flow, speed up healing and make our next day of touring even better than the last.
Example stretches:
The Couch Stretch, figure 4 stretch, pigeon stretch
Areas to foam roll:
Quads, especially lateral quads near IT band, adductors (inner thigh), glutes, calves (an often overlooked area)”

Meaghan Sutter is a Kinesiologist and Certified Personal Trainer who specializes in optimizing performance both on and off the mountain. Click HERE to check out Peak Training and Rehab Studio for more information.
Ski Ready and Avoid Injury
Mike Conway
Mike recommends following the Back in Action SkiRAD program to be ski ready and avoid damage. Many ski and snowboard injuries occur due to core strength issues, reduced joint mobility and postural stability problems. Postural stability is the ability to move some parts of the body while others remain stable, and is a key aspect of good ski and snowboard technique. The SkiRAD program is available as an app, allowing you to work through each of the exercises and tailor the program specifically to your needs.
“Core strength and stability is essential for optimal functioning of the lower extremity (especially the knee joint). Optimal strength and control in the hip and trunk region help minimize harmful stresses to the body while reducing the incidence of injuries and optimizing strength and power.
Tuck to Tilt

Purpose:
An ability to repeatedly perform a pelvic tuck (weak) position to a tilt (power) position is essential in sport to ensure you;
– Are able to adjust spinal positions according to the needs of load management or aerodynamics
– Achieve strong postures when encountering bumps/twists or handling of physical loads associated with lifting
Instructions:
In an athletic stance with trunk bent 45 degrees forward, weight through heels and gentle tension through hamstrings, the aim is to perform repeated pelvic tuck to tilts without movement in the upper trunk, arms or knees. Placing a ski pole on the back contacting the head, mid thoracic and pelvic with a slight gap in low back can improve awareness with performing tilts by monitoring tilts by increasing low back gap and closing / flattening gap.
Modify by placing your hands on your knees for support if too difficult with movement control or endurance.”

Mike Conway is co-owner and physiotherapist at Back In Action Physiotherapy and Massage. Download the SkiRad app from the AppStore or Google Play.
Prepare Body and Soul with Yoga
Maeve Jones
“Grease the wheels for ski season with these simple yoga moves. Whether you’re getting ready for skiing, snowboarding, or hiking backcountry, these exercises will prime your muscles to leap into action at first strap-in.
Chair Pose (Utkatasana) Place your feet as wide as your hips, with your toes pointing forward. Glue your feet down and tip slightly more weight into your heels. Sit back – think “knees back” over your heels. Feel your butt engage, and draw your ribs into your body to awaken your core. Lean into the burn. Stay for 15-30 seconds, then release.

Sumo Squat (Utkata Konasana) Turn your toes out about 45 degrees and bend so your knees stack over your ankles. Come upright in your chest and drive your weight down through your heels. Squeeze your buns and think “knees back,” pelvis forward. Sumo-size it with little pulses up and down in your hips.

Core, core, core. Start in a forearm plank and hold it for 30-60 seconds, then shift to one elbow and move to a side plank: stack your feet one over the other and squeeze your thighs towards each other. Hold for 30 seconds, then repeat on the second side. In both poses, engage your thighs and align your shoulders over your wrists. Breathe.
Keep Moving. Above all, keep your whole system moving regularly so that it remembers how to when the snow strikes. Stay connected with the lightness of your being by getting to some yoga classes, or clear your pipes with a daily run or a diligent home exercise regime.
Breathe. Make a point to slow down and enjoy yourself. Delight in this time to meet the natural strength of your body and to center in on yourself. Take a deep big breath and savour it. It’s a beautiful opportunity, really.”
Find Maeve teaching all this and more at Yogacara Whistler and YYoga Neowhistler on Fridays and Sundays.
Visit maevejones.com for more information
Fuel your Backcountry Days
Lou O’Brien
Lou recommends making batches of these energy-filled and easy to make snacks in advance, so that you can easily pack some into your touring kit to fuel your body throughout the day.
Take5 Peanut Energy Bites
Ingredients:
1 cup (220g) dates, pitted (if dry, soak in warm water for 10 min & drain well)
3 tbsp all natural salted peanut and almond butter
1/4 cup good quality dark chocolate, roughly chopped
1 tbsp chia seeds (or bub flax or hemp seeds)
2/3 cup rolled oats
Instructions:
Pulse dates in a food processor or blender until they’re in small pieces or form a ball.
Add oats, chocolate, chia seeds and peanut butter and pulse or mix until combined. You want there to be consistently small pieces but not overly processed.
Carefully roll into 1-inch balls (29-30 grams per ball) using the warmth of your hands to mold them together. The mixture should yield 14-16 balls.
To set, pop in fridge or freezer for 15 minutes. Otherwise, eat as is! Will keep fresh in an air-tight bag or container for up to week. Freeze for longer term storage.
Mocha-Pro Bites
Ingredients:
1/4 cup rolled oats
1 cup pitted dates (if dry, soak in warm water for 10 min & drain well)
3 tbsp all-natural peanut or almond butter
1 tbsp honey
2 tbsp cocoa powder
1 scoop of your favourite chocolate or vanilla protein powder
1/4 cup good quality dark chocolate, roughly chopped
Instructions:
Add oats to food processor or blender and pulse until they reach the consistency of flour
Add dates, almond butter and honey and continue processing until well combined. You will probably need to scrape down the sides of your processor and add a few teaspoons of water to get things moving. Add water sparingly, as adding too much will make the dough too sticky.
Add cocoa and protein powder and continue processing until fully combined.
Transfer dough into a bowl and add chocolate, mixing by hand until well incorporated.
Roll mixture into 1-inch balls. Should yield 14-15 balls.
Place bites in fridge for approx. 20 min to allow them to set.
Lou is a personal trainer and running coach at We Run Whistler. Join the group on Wednesday evenings to work on your cardio and ask Lou for more delicious recipes!
Cover photo by @bengirardi